You can strategically adjust pricing for items on your parts website in the SimplePart Control Panel.
TIP: If you intend to list your catalog at MSRP, there is no need to make adjustments on your Pricing page.
- Go to the Settings drop-down menu in the SimplePart Control Panel. Click on Pricing to navigate to the Pricing section.
- There are two sections on the Pricing page: Media Sets for this Website and Price Sets.
- Media Sets for this Website - This section contains the names of the product catalogs featured on your parts website. For example, parts, accessories or merchandise.
- Price Sets - Prices are set to “Default” pricing according to MSRP, but you can adjust the pricing or add Price Sets in this section.
- Click the Delete button in the Price Sets section to delete an existing Price Set.
- To add a new Price Set, click the Add New button.
- Click Edit to modify Price Sets.
- Enter a name for the new Price Set. For example, “eBay Pricing 10/13/23.”
- TIP: We recommend adding a date to the name so that you mark the time of the price set implementation. For example, a name for a new price set at cost +25% would be named “Cost Plus 25% 10/25/23.”
After you name the price set, click the Update button to save the name.
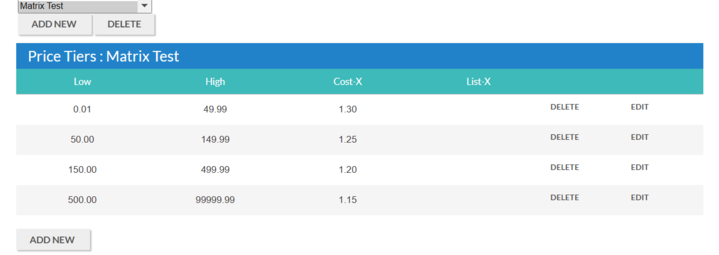
Pricing Tiers
Select the Price Set you want to create a tier for.
In the Pricing Tiers section, click the Add New button.
Select the Edit button on the right hand side to set your price tiers (ranges). You can set your low to high range and associated price (either in the Cost-x or List-x columns).
Click Update to save the changes.
List-x
To set the List-x, create a Price Set by clicking the Add New button and input the low to high range, and then input the product at List-x in the List-x column. Click Update to save the changes.
For example, set $0.01as low, set $300.00 as high, and set list is 0.95. In short, any product that’s priced between $0.01 and $300.00 will be at a 5% discount (list).
Cost-x
To set the Cost-x, create a Price Set, add a new Price Tier, input the low to high range, and then input the product at Cost-x (times) in the Cost-x column. Click Update to save the changes.
TIP: We generally recommend a “Cost+x” model, but you can also set a “List-x” model depending upon your business needs. Reach out to the Client Services team or the Dealer Strategy team for more information.
Assigning Media
After you create a Price Set with tiers, you will assign it to Media (Parts, Accessories or Merchandise, etc.). Determine your Media and click Edit. Select the Price Set you want to assign and then click Update.
To delete a Price Set, go to the Price Set section, highlight the set you want to delete and click Delete.
TIP: Do not delete a price set once it is assigned to Media. First remove the price set from the media, then delete.
Got questions?
Qualifying dealers can receive the benefit of our Dealer Strategy team. They can help you determine the right pricing model to use on your site so it aligns with your business goals. The Dealer Strategy team will help you decide which model is best for your business.
If you have questions at any point in this process, you can reach out to the SimplePart Dealer Implementation or Client Services teams.

